INSULATION BATTS INSTALLATION INSTRUCTIONS
When installed correctly, Insulation Batts are the most cost effective
method of reducing household energy bills.
What you need
A sharp knife and cutting board
Kneeling board (to span at least two ceiling joists)
Lighting (if required)
Gloves are recommended
A dusk mask (recommended in enclosed spaces)
Goggles (recommended if working overhead)
   
The first step
Check the distance between the studs before purchasing your batts. Measure
from the centre of one timber stud.ceiling joist to the next. For 450mm
spacing use 430mm wide batts, for 600mm spacing use 580mm batts. You have
a few options for insulation batts.
Tontine Insuloft 100% Polyester
Insulation Batts
Made from 100% pure polyester these products
are user friendly, non-irritant and non-allergenic, making self installation
easier, and being formaldehyde free do not pose a health risk to installers
and home occupants alike. Tontine Insuloft polyester batts come in
a full range of sizes and thermal
ratings to suit all framing. Tontine
is an ISO9001 & ISO14000 accreditted companying offering Premium Quality
products at affordable prices.
Autex
GreenStuf 100% Polyester Insulation Batts
Made from 100% pure polyester these products are user friendly, non-irritant
and non-allergenic, making self installation easier, and being formaldehyde
free do not pose a health risk to installers and home occupants alike.
Autex GreenStuf & QuietStuf polyester batts come in a
full range of sizes and thermal ratings to suit all framing.
Fletcher
Insulation Glasswool Pink Batts
Ceilings
Standard
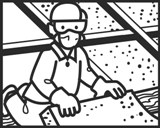
Batt packs are designed to fit in 99% of average size manholes.
Work out how many packs you need and pass them unopened through the manhole.
Spread the packs around inside the ceiling before opening them.
Never walk on plaster ceilings. Stand on ceiling joists only.
Place kneeling board across at least two ceiling joists before kneeling.
Lay batts between ceiling joists starting at the furthest point from the
manhole.
Butt the batts closely together to ensure there are no gaps left at joints.
Cut the batts to the required size to fit around vents, exhaust fans and
flue pipes, allowing a space of at least 100mm.
Continue until the entire ceiling area is covered, and extending a minimum
of 50mm onto the external wall top plate.
Offcuts may be used to fill small spaces to ensure a complete coverage.
Be extremely careful of electrical wiring in the ceiling. Where possible,
place the batts underneath electrical wires or use a spacer to create
an air gap between electrical wiring and insulation.
Do not put insulation over or around recessed light fittings. Refer to
manufacturer's recommendations as to how much gap to leave around their
perimeters. Minimum is 200mm around their perimeter. Downlight covers
are available for extra protection.
Cathedral / Raked Ceilings
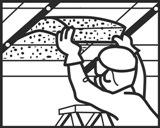
In the case of cathedral ceilings, the batts should be installed prior
to fixing the plasterboard.
Batts should be supported by string or twine, running at right angles
to the ceiling joists so they remain in place until the plasterboard is
installed.
Walls
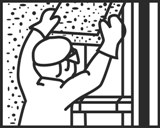
Brick veneer
It is important that the batts are secured so they cannot fall into the
cavity or come in contact with the outer brickwork, allowing moisture
to pass from the exterior wall to the internal lining.
Foil insulation or long lasting string/twine should be fixed across the
exterior face of the frame before installing the batts from the inside.
Where string/twine is used, 2 lengths of twine should be fixed between
each set of studs from the top to the bottom, running parallel with the
studs and evenly spaced.
Butt the batts closely together between studs to ensure there are no gaps
left at joints.
Fibre cement or weatherboard cladding
A breathable foil or building paper must be used so as not to cause moisture
build up.
Butt the batts closely together between studs to ensure there are no gaps
left at joints.
Cavity brick walls (double brick)
Batts are not recommended for use in cavity brick construction.
Please read the detailed instructions before you install the batts yourself.
If you would like someone to install the batts for you,
Please Call: 1300 662 554
INSTALLATION TIPS
Insulation will work well if it is installed correctly. The following
tips will help you achieve the best possible performance from your insulation:
- Do not compress bulk insulation. It must retain its normal thickness
wherever possible. In cathedral ceilings make sure there is sufficient
space between the roof and the ceiling lining for installing the recommended
insulation without compressing it.
- Keep bulk insulation dry at all times. Performance will be inhibited
if the insulation becomes wet. Make sure packs are stored in a dry place
before installation.
Avoid gaps in the insulation. Make sure batts are firmly butted against
each other, ceilings joists and wall frames. Even if only 5% of an area
is left un-insulated, up to 50% of the potential benefits may be lost.
- Do not cover electrical cables and equipment with insulation. Keep
insulation clear of wiring using an appropriate separator. Have them
inspected by a licensed electrician to ensure the insulation has been
installed safely.
- Do not install insulation within 100mm of hot flues or exhaust fans.
- Do not put insulation over or around recessed light fittings. Refer
to manufacturer's recommendations as to how much gap to leave around
their perimeters. Minimum is 200mm around their perimeter. Downlight
covers are available for extra protection.
- Batts can easily be installed to a thickness greater than the ceiling
joists. This need not restrict roof access as ceiling joists are usually
still visible and the batts will usually return to their original thickness
if walked on.
- Insulate internal walls between the house and uninsulated spaces such
as garages and storerooms.
|


